If you need an easy to use, yet powerful way of organising your data on Mac OSX then you should check out Bento 3. It integrates with some existing Mac applications too. Check out the review.
Supplied by: Filemaker UK


If you need an easy to use, yet powerful way of organising your data on Mac OSX then you should check out Bento 3. It integrates with some existing Mac applications too. Check out the review.
Supplied by: Filemaker UK
Looking for alternative image editing application for Mac OS X... look no further.
Want to know what applications I use most? Check out the video What's in My Dock below.
It will come as no surprise that I upgraded to the latest OS offering from Apple. In the last couple of weeks using Snow Leopard it has been a mixed bag. 95% of it is all very good. On the odd occasion Quicktime X does not work as I would want it to. Then there is something wrong with perhaps a memory leak, as I get lots of spinning beach balls and hangs. There is also a font issue with Quark Xpress and postscript type 1 fonts. Apart from that (which I can put up with) it is all pretty snappy and good. Below are a series of videos that I produced, covering some of the main new features.
Quick Look - The Finder in Apple's Snow Leopard OS
Quick Look - Dock Exposé in Apple's Snow Leopard OS
Quick Look - Stacks in Apple's Snow Leopard OS
Quick Look - QuickTime 10 Player in Apple's Snow Leopard OS
Apple's Mac OS does a pretty good job of defragmenting files. However, if you do a lot of work that involves moving files around, then defragging your hard disk from time to time is a great idea. Check out the review below of iDefrag from Coriolis Systems.
Product: iDefrag
Price: £22.94
Supplied by: Coriolis Systems
Contact: +44 207 043 8217
Rather than bring you one (ever so) long review of the new QuarkXpress 8, I thought it was a better idea to break it down. Over the next month or two keep checking back on the Geekanoids website, where you will find a series of videos showing (new and old) features of this superb page layout software. We kick off with a look at the new graphic elements control.
Product: Quark Xpress 8
Supplied by: Quark UK
Contact: + 44 (0)870 351 8670
Backing up your files is very important. Imagine if you lost all of your photos, or those files and projects you have been working on. Prosoft's Data Backup 3 gives you a cost effective solution. Check out our video review below.
Product: Data Backup 3
Price: £39.99
Supplied by: Prosoft Engineering
Contact: 925-426-6100
The DADDY of CD & DVD writing software has released version 9 of their Toast Titanium. I have used Toast for as long as I can remember, so it brings me great pleasure to bring you an overview of this latest release in the video review below.
Product: Roxio Toast 9 Titanium
Price: £69.99
Supplied by: Roxio UK
Contact: click here
I have been reading on many forums that users are not too impressed with Stacks in OS X Leopard. Well, I have to agree, the way they are configured is not great. One of the main complaints is how to get the frontmost icon to look like something meaningful. I hope this short screencast helps a little.
 Over the past week I have had the chance to take a look at Alien Skin Software's Eye Candy 5 'Impact', which is a collection of ten filters for Adobe Photoshop. The latest version of the software is a universal application and as such works very nicely with the latest CS3 incarnation of Photoshop. There are other collections available in this range of software, including Nature and Texture filters, which I will be looking at over the coming weeks.
Installation of the software is very straightforward, with an Alien Skin folder installed within the plugins folder where Photoshop resides. You can then gain access to the various filters and effects through the drop-down 'Filter' menu with your Photoshop application.
I can personally remember years ago using other Alien Skin products and loved the effects I could achieve with text and the like, so I was keen to delve in to see what was on offer.
Within the Alien Skin Impact menu, you have the choice of ten filter, including chrome, bevel, gradient glow, and glass effects, plus the ability to add bevels, reflections and shadows. Impact has three new filters called Backlight, Brushed Metal and Extrude. 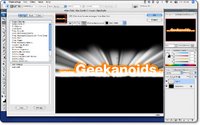 Backlight produces exactly what you would expect, but with a very dramatic effect. You can choose from factory presets in the left panel of the filter window (I chose Forward Fog Streaks) or you can create your own custom settings and save them to the User Settings panel (bottom left). You can control the angle and the intensity of the effect within the preview window, as well as zooming in, panning around an image and altering the preview background before you commit to a filter. When you do click OK, the effect is rendered onto a new layer within your Photoshop document.
What amazed me was the ease of creating great effects, and with just the Backlight filter alone, I could have spent hours trying out new effects. The speed of applying the filters were impressive too.
 The Extrude filter (shown here) was almost instant with my PhotoShop running on a 2GHz MacBook Core2Duo, imagine what it would be like on a good desktop machine. Again, Extrude offers a lot of presets, and is great for adding depth to text or any graphic element. I can certainly see it being a great tool for web designers and graphic artists alike.
The last of the three new filters is Brushed Metal, which as the name suggests makes your graphic element look like metal. On offer are various types of brushed effect; handbrushed, circular, and linear, all available in different colours and intensities. Even a Vinyl Record effect has crept into this section, hardly metal, but I loved it and will definitely be using that one in the future.
Of the filters I have note yet mentioned, Super Star adds some freaky and funky star effects, Motion Trail adds some very effective swishes and sweeps to your artwork, and Glass is pretty self explanatory (and very effective). Perspective Shadow does a lot of what Photoshop can do anyway, but within this filter the various Reflect presets allow for some great effects. My last image shows 'Reflect in Front - Sharp' and I must say, this alone impressed me. It is not just the end result that is impressive, but the speed in which Alien Skin allows you to be creative.
 So, who should this product appeal to? Well, if you are a graphic artist, creative professional, or web designer, then Alien Skin Eye Candy 5 Impact is a must. It offers up some great filters that will save you a great deal of time, whilst giving you clients that wow factor with ease… and that is before we even look at the pricing. If you are an everyday Photoshop user, then again, this collection of filters will allow you to experiment and create some great artwork, that may well have been difficult to achieve without it. The pricing makes this a must buy product; just buying impact by itself will only set you back £49, which in my mind is a bargain. If you would like to save some money, then take a look at the bundles. You can pick up the Eye Candy 5 Bundle, which contains the Impact filters reviewed here, plus the Textures and Nature collections for just £79, this is a fantastic bargain, but things don't stop there. The Eye Candy Effects Collection contains all of the above, plus Snap Art and Xenofex 2 (which retail separately for over £70 each) for the paltry sum of £239 (currently on special offer for £199 at XChange International), at this price, I know which package I would buy.
If you need to increase your creativity and productivity then look no further. Adding some or all of these Alien Skin filter collections to Photoshop will be money VERY wisely spent.
Note: check back soon for reviews of Alien Skin Eye Candy 5 Textures and Nature, plus Snap Art and Xenofex 2.
Product: Alien Skin Eye Candy 5 : Impact
Price: £49
Collection Price: £239 ($399) as part of the Eye Candy Effects Collection
Supplied by: Alien Skin Software
Telephone XChange International: +44 (0)20 7490 4455
Email: info@xchangeuk.com
 The Sims Life Stories is a welcome addition to the Sims storyline and will certainly make you sit up and take notice. Right from the outset, you should know that if you like the Sims, you will get the most of out this offering, it is definitely a game that you will play for hours and enjoy minute of it. Of note, this is not an add-on or expansion pack to Sims 2, it is a full standalone game.
The graphics on this game are fantastic. As soon as you see the little clip at the beginning of the game, you think wow! The intro is great, and makes you want to get into the gameplay as quickly as possible. But then, when you look at the options and click on the graphics option, you can make the pictures even more detailed! Adjusting the graphic detail makes a big difference to your enjoyment of the game, so if you system will handle it, put everything up to max.
Next up is the sound. The Sims may not speak English but their own language is very entertaining. The sound is very life like and somewhat comical when they speak. When they take a bubble bath, it really does sound like a bubble bath, or when they are cooking something, it really does sound like your cooking and sizzling something tasty. As I said earlier, it really is life like.
 Right, let's move on to the story. Well first of all there is Riley's Story. You get to play Riley who is staying at her Aunt Sharon's house since she lost her job. Riley wants to bounce back into action by, getting a brand new job and searching for a new guy to start a family with. Finding out that her high school ex-boyfriend is about town, she starts to fall for him again. Will her love series end in a happy ever after? I won't spoil that part for you, only you can decide the outcome.
 Next there is Vincent's story. At the age of 9yrs old his Uncle bought him a kite. He attached a couple of plates and wrapped the kite in foil. He also added two rockets, filled with fuel or helium to the end to make his very own satalite. In his adult years he is a billionaire! Now that his job is being a business tycoon, the millions are rolling in. At the start of Vincent's story he is coming back from a two week business trip. Vincent left his house in the hands of his trusted girlfriend Samantha. As soon as he gets out of the helicopter, Vincent is greeted by Samantha, with a great big hug. They have been dating for just three weeks in total and Samantha bursts out a surprise marriage proposal. Vincent says no, so you have to help him on biggest challenge of all, E-Dating…
There really isn't just a single brilliant part in Life Stories, since the whole game is superb. The Sims Life Stories is one of the best games I have ever reviewed, and I will continue to play it for a long time to come! There is a whole new range of clothes and outfits for the Sims to wear, which are fantastic. Plus, the new objects and inventory you can buy for your Sim to enjoy and use for their aspirational needs. This game is definitely worth every penny and I would recommend that anyone (young or old) would love to play this fantastic game.
Review by Pamela Cryer
Product: The Sims Life Stories
Price: £29.99
Supplied by: Aspyr Media Europe Limited
Contact: +44 (0) 1923 200 940
Email: info_europe@aspyr.com
 DocumentWallet from GGT Enterprises is one of those applications that is difficult to see how and why one would use it, but I decided to dig a little deeper and see if I could find a permanent place for it in my dock.
Basically, in its simplest form it is a scan organiser. You scan directly into the DocumentWallet application and then it asks you to assign certain tags to your scan. The fact that after every scan you can assign a title, date, and category makes this a very useful tool, but it also does a lot more besides.
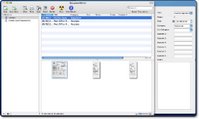
For my test I scanned in a selection of post office receipts and bank statements, each time entering the relevant information. I could choose between scanning a single item, or if I selected 'Scan Multi' for a multiple page statement, they would be saved under a single entry in the application window. So once my scanning was complete they were presented in a three pane window (see image). To the left are the 'Collection' titles, which work in much the same way as iTunes or iPhoto libraries. The upper right window gives me a list of my scans, which can be sorted by clicking on the relevant heading. The bottom window shows me thumbnails (which are adjustable in size) or my scans. There is also a details drawer, which pops out the right hand side. This displays information about any scan that I highlight.
Once all this information is in DocumentWallet I can do various things with it, and this is where the application shows its usefulness. I can search my documents and as I type in the amount of scans (and their thumbnails) reduce accordingly. Apart from the powerful searching, I can also highlight a scan and save, print, email, or burn it. If I select email, it is placed within my email application, ready for adding some text to the recipient.
Another handy feature is being able to add to my scanned documents, so as I receive more credit card statements (rather unfortunately this is bound to happen), I can add them to my existing scans. This makes for very neat and effective organisation. I can even add to things from external files, so if someone emails me some receipts or invoices, I can add them into the relevant location within DocumentWallet.
So, what started out as a simple scan organiser, really has shown me that I can make my files a lot easier to handle. Just for the sole purpose of getting my bank and credit card statements into order, it is worth its $29.95 asking price. It works with any TWAIN compliant scanner, and you can even try it for 21 days before you commit to making a purchase. If you do a lot of document scanning, then I would highly recommend that you try DocumentWallet, you will be pleasantly surprised.
Product: DocumentWallet
Price: $29.95
Supplied by: GGT Enterprises
Contact: support@receiptwallet.com
 Learning a new application can sometimes be a pretty daunting experience, well it was for me anyway. That was until I stumbled across Total Training, who publish a series of DVD's with a difference. So, I decided to brush up on my Acrobat skills courtesy of "Total Training for Adobe Acrobat 8 Professional".
Now, what I thought I would receive and what I got was a nice surprise. Not one to read the instructions first, I popped the first of the two DVD's supplied into my MacBook. When Apple DVD Player didn't launch I decided to take a quick squizz at the instructions to reveal that I had to install an application called Launchpad, which incidentally works on both Mac and PC platforms. Once this is installed I could get things underway.
Just to explain what Launchpad does… apart from the regular video playback controls, it allows you to easily bookmark sections. This allows you to easily revisit sections at a later time. There is also a Bonus Button that unlocks special features throughout the training session. Plus, a Get More Training button allows you to view additional tutorials and to see the entire catalogue of DVD's available. You can also alter the size of the training video as well as access a contents and help section.
Once the training gets underway, you will soon see that the way features are explained is really invaluable. The first sections gives you an excellent overview of Adobe Acrobat, followed by creating PDF files, linking, commenting and security within your files. The more advanced second DVD gives you details of how to create forms, preparing PDF files for prepress, presentations and how to work with layers. There is a lot more covered besides what I have mentioned here, so it is important that I emphasize just how thorough this training package is. I came away from this experience with a much better knowledge of Acrobat, along with things that I did not even know were possible. The beauty of training like this, is that you can do it at your own pace, take breaks when you want to, and of course you can go over sections as many times as you need to grasp the particular subject. The Total Training for Adobe Acrobat 8 Professional package is worth every penny.
Product: Total Training for Adobe Acrobat 8 Professional
Price: £120 +VAT.
Supplied by: Ceritec (UK)
Contact: 0870 766 9826
 Overflow from Stunt Software has been installed on my computer for almost a month now. I waited this long to bring you the review because I wanted to see if I actually used it, and if it performed well. So exactly what is Overflow?
Well, if you dock is anything like mine, it is bursting with too many icons, all stretched out in one long line. Sometimes I find myself searching for an application just a little to long. Yes, I know that Spotlight is there for quick launching, but I want something more GUI based... this is where Overflow steps in.
Overflow is a small application that be set to launch at system startup, it resides in your dock, but is also accessible by pressing a keyboard shortcut, which you can set to pretty much anything. Upon launch you are presented with a grid of spaces and some categories listed along the left side. To set Overflow up you simply set the categories, such as applications, utilities, documents etc. Then you drag the icons (as you would to the dock) into the grid.
Then you can quickly and easily launch applications from Overflow. It is nice that you can also drag regularly used documents into the application. For example, if you always load up the same letterhead template to use, drag it into Overflow and you can save yourself some time. Nice touches like an icon glowing when you put your mouse over it, make this seem like a really simple, yet swish app. You can even navigate Overflow via your keyboard, which makes it a lot quicker to launch things.
Overflow doesn't really do anything that you cannot do with the dock, but what is does is organise it, and for that I commend it. This is one application that will definitely stay installed on my Mac.
Product: Overflow
Price: $14.95
Supplied by: Stunt Software
Contact: info@stuntsoftware.com
 Hello and welcome to the review of Trend Micro Internet Security 2007. Again I am dictating this review with vista speech recognition. It was essential when setting up my new vista laptop that I give it the necessary protection from the outside world. There are many virus and internet protection suites available, but quite a few are slow in bringing out bicester compatible options. Trend stepped up to the mark with their new vista certified version of the Internet Security suite.
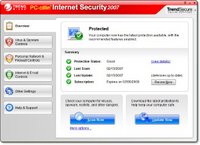
Installation was very straightforward taking just five or six minutes to complete, followed by the obligatory virus definition updates. Once everything was fully up to date you are presented with a very nice user control panel. This shows the current protection status, the dates of your last scan and last update, followed by when your subscription expires.
This application gives you protection against viruses and spyware, a personal firewall, wireless network protection, and the ability to protect other computers on your wired network. Moving on there is also phishing protection, a spam filter, web site access controls and date or theft protection… Pretty much every aspect of your online activities can be protected in one way or another. What I like about Trend Micro Internet Security is the fact that it seems to integrate so much better with the system than offerings from the likes of Symantec. What I mean by this is that it doesn't take over your system, all too often when installing a Symantec product I have experienced problems with connecting to the Internet and to other computers on my network.
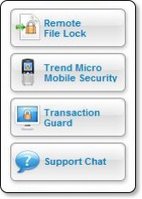 Apart from the excellent experience so far, this Trend product also offers some really nice additional tools. Without going into into too much detail Remote File Lock really grabbed my attention. It allows you to create a folder on your PC or laptop and assign a pin number to it, then you can drag any private or sensitive documents to this folder. In the unfortunate event of your PC or laptop being stolen you can lock the contents remotely of the folder via the Trend Security website and prevent your files from being accessed. If you then later recover your stolen property, you can reverse this action and unlock your files. The extra services panel on the user interface also allow you to access Trend Micro Mobile Security, Transaction Guard, and Support Chat.
Mobile Security provides virus protection for your mobile phone, which is a growing area for concern. Transaction Guard is free software that allows you to protect your personal information whilst completing things like Internet banking or password sensitive actions. This is not an online service, but a free application that you physically install on to your PC. Support Chat is quite simply access to online live support. One last thing worth a mention is the HouseCall three scan feature available on the Trend website, this allows you to scan a PC with the web based software and it delivers you hate detailed report of security threats detected on your computer.
In summary I am very impressed with the amount of features offered by Trend Micro Internet Security 2007. Not only is the interface a pleasure to use, but the installation process was a breeze. If you need to protect your windows based PC, then look outside the circle and try something different for a change. If you have never heard of this product then the Trend Micro website does a very good job of explaining exactly why their product is superior. I for one will never go back to a Symantec based product. Trend Micro Internet Security 2007 is available starting at just £39.95 for a downloadable version with a one year subscription to updates, or £59.95 with two years of updates. If you prefer to have a boxed version lend this costs the same amount but with an additional £4.50 shipping. I should also mention that this cost gives you a licence to install protection and three PCs, now that is what I call value for money.
Product: Trend Micro Internet Security 2007
Price: £39.95 (start price)
Supplied by: Trend Micro UK
Contact: sales@trendmicro.co.uk
For the review of Roxio Toast 8 Titanium we are pleased to release ou first Video Podcast in the form of a Screencast Review of this superb application. This video podcast is the first of many... we aim to bring you new video content every other week, which may take the form of some Mac news, or where appropriate reviews of new products.
Leave us some feedback in the comments, it would be nice to hear your views.
Product: Toast 8 Titanium
Price: £69.99
Supplied by: Roxio UK
Contact: www.roxio.co.uk
 I find dealing with money boring, but at the same time if I have a spending spree my online banking access is not always bang up to date. This can sometimes cause me a problem, as I have all my fresh shrunk wrap purchases on the table, but don't know if I have enough left for a steak 'n' chips or if I will have to manage with cheese on toast.
This is where Cha-Ching steps up to the mark, this superb money manager from Midnight Apps promises to breathe some fun into managing your money. Well, the title gives it a good start, as do the icons within the app, everything has a feel good factor.
For most of the time, the app is split into a three pane view. The vault on the left gives you quick access to your paid and pending transactions, as well as an account list. Setting up an account is easy, you name it, assign a bank name to it, starting balance, and type of account. You can choose from checking, savings, credit or online. There is even space to enter the URL of the bank, which can then be viewed at any time using the 'online' tab, instead of having to go into your internet browser. Within the aptly named 'Vault' you can also set-up budget accounts, along with folders and smart folders for organising and sharing across a network.
Getting my test account ready took me about two minutes, and this is where the fun starts. Entering a withdrawal from my account was really easy, with all the details input through the right hand pane. You also get the option of taking a photograph of the item purchased, which is great fun. I snapped the photo of my DVD purchase using the MacBook's built-in iSight camera. This could prove useful for companies who may need proof of purchases for insurance purposes.
It is also possible to enter pending transactions for forthcoming expenses, and also if they are repeating you can choose between daily, weekly, bi-weekly, monthly and yearly repeats. So what started out to look like a simple app, is full of very useful features, but remains easy to use.
I have only just touched the surface so far, so stay with me. At the top of the Cha-Ching application window when in accounts view, there are three tabs. 'Overview' is just that, it shows you your latest incoming and outgoing money, as well as upcoming transactions. The 'Transactions' tab again shows you a list of what is happening with your hard earned cash, but also provides a third pane showing more details about each entry. This third pane is also where you enter new transactions. The final 'Online' tab, which I mentioned earlier is a built-in browser, where you can view your online account. This makes it very easy to cross-reference things, without having to switch ot of Cha-Ching and into Firefox or Safari.
Well, now managing my money is fun again. Cha-Ching is in beta form at the moment (version 0.5) and already it is shaping up very nicely. The only thing I would like to see are some sound effects, like the cha-ching sound when I put money in, and maybe a discouraging arrrgggghhhh sound when I take money out.
Overall, I am really impressed, Cha-Ching offers lots of features, a very clean and easy to use layout, and that all important Mac feel. If you want to manage you money without it seeming like a task, then breathe some fun back into your banking and check out Cha-Ching. A 30 transaction demo is available from the link below, with a single user license costing $14.95.
Product: Cha-Ching
Cost: $14.95
Supplied by: Midnight Apps
Contact: support@chachingapp.com
 When I stumbled upon the EazyDraw stand at this years Mac Expo in London, I was intrigued. As a long time Freehand user, I had dabbled with Illustrator and earlier this year reviewed Lineform. Finding another alternative drawing and illustration package that claims to 'bring the fun back into drawing' was well worth taking for a spin.
Installation is as simple as dragging the application icon over to a suitable place on your Mac. The version I am reviewing here is 2.1.3 and upon first launch you are asked to enter your license code (or indeed use in demo mode). The interface presents itself with large, colourful icons, and right from the start you know you are in for a treat.
All of the basic drawing tools are available, for creating squares, boxes, ovals, text, bezier curves and the like. The icons within your tool panel are very colourful and almost comic-like in appearance, with each really needing no explanation of what they do. If you do need extra information, hovering your mouse pointer over each tool shows you a text description of the tool function.
Where EazyDraw differs (and adds in that fun element) is in the way you manipulate these objects. Just take a look at my screenshot of rotating an object, this is just superb, you just click and drag to select two control points, release the mouse button, then rotate the object to the desired angle. The function is so well designed and so intuitive it allows even the most inexperienced user to understand what they are doing. For this alone, EazyDraw should be commended.
If you want to dig deeper into the more advanced features of the application, there is a folder of tutorials that you can refer to. The tutorials explain things like creating blends, flowcharts, using grids, and using transparency, the list of topics covered is very thorough. The 'Road and Intersections' tutorial was of personal interest, as I create a lot of maps. It shows you how to create a simple intersection, but also a really neat timesaver in the form of the Ribbon tool. When you cross one road with another, the Ribbon tools creates an open intersection, something I always had to do manually in Freehand. If you need more information about an object in your work area, you simply select it and then click on the Details icon, which shows you the various attributes for the object.
Text entry was a mixed bag for me, mainly because it works a little differently to what I am used to. You have to draw a text box out on the page, making a container for your text. This is OK, except when I then tried to apply a fill to my outline text, it filled the whole container. You can correct this, but I am so used to just being able to click an area on my work area and start typing. So, this is not necessarily a bad thing, just not very intuitive. On a more positive note, EazyDraw offers some great text features. It can spell check what you type on-the-fly, underlining any suspect words. You can also get it to spellcheck a whole text entry after you have finished typing, or even get it to speak back what you have typed. All these extra features are really nice touches and the spellchecking is really useful. Handling of file formats is great too, with all the major formats supported including PDF, EPS, TIFF and JPEG to name just a few, you can also import from MacDraw and ClarisDraw.
Whilst you are using EazyDraw you find yourself drawn into (excuse the pun) the application and actually enjoying what you are doing. Drawing actually becomes fun again and the way many of the features work brought a smile to my face, leaving me thinking "Now why didn't Freehand do it like that". Anything from basic illustrations, right up to very technical drawings can be achieved. EazyDraw is suited to the beginner, at any age, right up to the more demanding user. If you want to use an alternative to the mainstream applications and re-introduce some fun to your work, the you should really check out EazyDraw.
EazyDraw is the work of Dekorra Optics. The application is a universal binary, supporting both PowerPC and Intel based Mac. It retails in various forms, with licenses ranging from $20 for a 9-month version, $95 for a full license and $119 for a CD version.
Supplied by: Dekorra Optics
MSRP: $95 full version
 How many times have you launched something like Illustrator and been frustrated by the hundreds of tools thrown in front of you, when all you need is a simple application for creating a quick logo, map or other drawing? Or perhaps you are new to the world of design and you need to create something, but do not have the budget to spend on every single app on your shopping list. Until now, there has not really been a viable alternative, so Freeverse steps up to the mark with their 'Lineform' application.
Many of my comments in this review may seem to sound negative, but I need to put you straight on this right away. When I say that Lineform offers a simplistic interface, or takes the easy route to giving me the tools to do the job in hand, this is really a positive. For many years now I have used Freehand instead of Illustrator, because the interface is a lot simpler to find your way around. Lineform is very similar to this, the interface is very clean and allows you to get on with what you are trying to achieve, but when you need more powerful tools, they are on tap too, but without being over-complicated (unlike some very expensive apps).
So, on first launch you are presented with your main work area, along with collapsible palettes (initially along the left side of the screen). The top palette deals with fill colours, which can be empty, solid, gradients, images or text. Next up is stroke attributes, such as line weight, type of line, arrow heads, etc. The arrow head part is nice, in that once you have applied your line weight and you can adjust the size of the arrow head with a simple slider.
The effects palette deals with opacity, blend mode and simple shadows, followed by a layers palette. The inclusion of layers just goes to show that Lineform is no lightweight, you can hide this palette away when you first start, but once you get going on more complex documents you can introduce the power of layers into your documents as you progress.
The grid options are also really nice, you can adjust the size, steps, snap to grid and even bring the grid in front of the illustration you are working on and to finish the palette count off, you have one for controlling your layout and page setup. A ‘transform’ palette (amongst other things) has also just been added to version 1.2.2.
Wow, time to take a breath, that long list of palettes really only touches the surface. Once you get going with Lineform you will see how intuitive it is, for example, in one of the screenshots you will see a simple map I created (in a couple of minutes). If I were creating this in Illustrator or Freehand, as I went through shift->selecting various objects, I would have no idea if I had picked up everything I need to change. Lineform keeps you right up to date, by giving you an update of how many objects you have selected, if they are all of the same type it will tell you 'x number of rectangles selected' or if you have a mixed selection it will read 'x number of graphics selected'. This is great, very useful and in this same area it also tells you what you can do with your selection, for example resize or rotate it, along with which modifier key you must press to have the desired effect.
All of the bezier curve and line control you would expect are on tap, with control handles, combining, separating and reversing paths. Object conversion, union, subtract, intersect and XOR functions, I could list them all, but I will summarise by saying that I could see no major omissions.
When it comes to file handling, Lineform comes up trumps again. You can export your files as a BMP, EPS, JPEG, PDF, PNG, SVG or TIFF, with control for bitmap resolution and transparency. I tested this and opened up the resulting file in illustrator and everything seem hunky dory. Simply selecting the 'save' option results in a document that can only be opened in Lineform itself.
Importing is great too, with SVG files remaining fully editable and most other formats (JPEG, EPS, PDF etc) also supported.
Where does Lineform fit into your software line-up?
Well, using myself as an example, I own Illustrator already and Lineform will still take a place in my dock. I will use it for quick logo creation, diagrams, etc. It may even take over as my main drawing app, but only time will tell on that front. I will revisit this with another review in a couple of months, but I am sure that Lineform will still be in my dock as an ‘everyday application’.
For those of you who do not own a drawing program, well all I can say is to try it, you are likely to find that it meets your requirements, as it really does deliver everything I could see myself needing for everyday use. The money you will save is a substantial amount and shouldn't be sniffed at.
To top it all off, Lineform's publisher Freeverse offer great support that just seems so much more personal and helpful than some of the bigger companies, coupled with a great forum, where the Freeverse team are very active to give quick answers to your questions and comments. This all adds up to a package that delivers far beyond its' bargain price. If you are still not convinced, then download the trial version, check out just how useful and powerful the software is and then upgrade to the full version, for me it’s a forgone conclusion.
To download a printabel PDF version of the review click here.
Product supplied by Freeverse Inc.
Contact: 212-929-3549
Retail price: $79.95
Link to product.
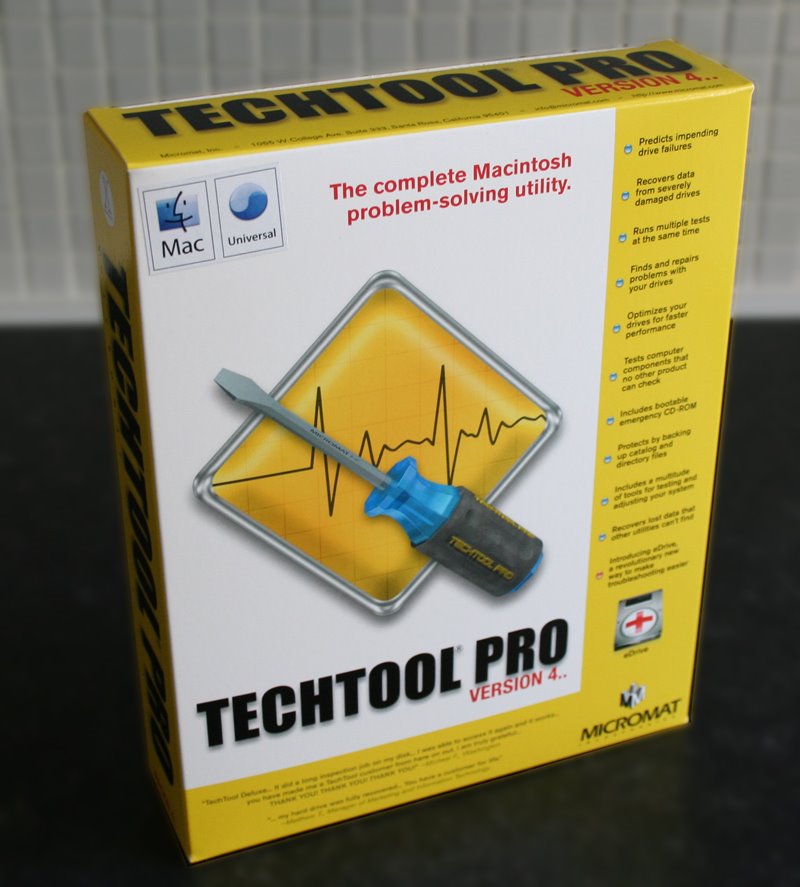 Having the knowledge that your Mac is safe and secure is a good thing, backing up is also a must nowadays (even before we get Apple's Time Machine), but what about keeping your system in top condition, looking out for hard drive problems, recovering data in the event of corruption, or even having a method of recovering your system if OSX goes all wonky on you. Well, there are many applications out there, but only a few that users rely on and MicroMat's Techtool Pro is the latest of the bunch.
Inside the box you get the install DVD and a printed (yes I said printed) manual. Many applications come with online or PDF manuals nowadays, so it is nice to see a really good manual to guide you through the process.
Installation was really straightforward (screenshot 1) and you are also given an uninstall option, should you wish to use it (very doubtful, but nice to see it). The version reviewed here is 4.5.1 which is the latest Universal Binary release. A restart is required to complete the install and you are also prompted to test that your Mac actually boots from the install DVD, in case you need to do this at a later date. For my testing I was using an Apple MacBook 2GHz laptop and I am happy to report that it booted fine (and fairly snappily) from the DVD. To note, this DVD is 'Dual Boot' so should work fine with both Intel and PowerPC based Macs. Also on the DVD is a disk image for version 4.1.2 which should give earlier compatibility, should you need it.
On first run you are asked to personalise the TechTool Pro with your name and serial number and to register it online. The whole process takes just a few minutes and is well worth doing.
The main screen (screenshot 2) presents you with five icons across the top, clicking on each expands the window to show the options in each category. I will run through each in turn, but feel I should jump to a feature that is very important, that I have previous knowledge of.
The Knowledge
Clicking on the 'Tools' icon gives you six new options (screenshot 3). I will cover all the other options later on, but here I want to run you through 'eDrive'. When first clicking the 'Tools' icon you are prompted to only run things in this section when connected to the mains power, this is a safeguard worth noting, as you definitely do not want your laptop to switch off whilst performing a task.
Now, to put it simply 'eDrive' creates a mini partition (about 4Gb required) of Mac OSX and a copy of TechTool pro. This means that should you system crash and become unusable, you will be able to boot from your 'eDrive' without the need for a bootable CD or DVD. It is also worth noting that if you have updated your main TechTool Pro application, you can also update your eDrive too, so this would supersede a bootable CD or DVD anyway.
The procedure is simple, click the 'Go' arrow next to 'eDrive' and you are presented with a window (screenshot 4) where you select a destination for your bootable 'eDrive' and the source drive (which contains your OS). It is worth noting that you do not need to create a 4Gb partition for this procedure as TechTool Pro does this all for you. In my tests, it took nine minutes to create my MacBook's eDrive, which is pretty fast. I used an external firewire mini hard drive, running at 5400rpm, but you can create your eDrive actually on your Macs internal hard drive, or any drive physically connected to your Mac.
The process creates a small partition on your hard drive which contains a basic OSX install, the TechTool Pro application and a few other applications, such as Safari, Disk Utility, Console etc. All of your other applications are stripped out, which is good to see... to download the full review complete with screenshots click here.
Product supplied by Micromat Inc.
Retail price: $98.00
Contact: 1-800-829-6227
Link to product.